New feature for Xero: creating bills directly in ApprovalMax

We’re constantly working on extending the ApprovalMax for Xero capabilities. Recently, we added a new feature that allows to create bills directly in ApprovalMax, which increases data security and integrity. The procedure itself is very much the same as creating bills in Xero because the required data such as supplier and inventory item is synced from the Xero organisation. There are two options for bill creation in ApprovalMax: either in the web interface or via the mobile app.
Who is it for?
This new feature is particularly useful for organisations that create bills in Xero manually, without a data entry tool. It allows businesses who employ many contractors and get lots of supplier invoices to let suppliers and contractors create their invoices themselves – and have them routed for approval right away. The same applies to organisations where multiple staff or volunteers initiate large numbers of invoices. In a nutshell: ApprovalMax now makes it easy to delegate bill creation to users, without having to grant them access to the Xero file. They will only ever see that part of information that’s relevant to the task, while sensitive Xero data is protected from unauthorised users. When bills are created in ApprovalMax it means they will only be published to Xero after proper multi-step authorisation. This ensures that there are no more overlooked invoices and no duplicate bills in the general ledger.
Inviting users to ApprovalMax
To let suppliers or other users create bills, you have to invite them to ApprovalMax. All you need for this is their email address. You can do so either on the Users page or on the Workflow Setup page. The difference is that via the Users page you can add users in bulk (you’ll need to set up their roles later), while on the Workflow Setup page you can define roles and assign users to them at the same time. When you’re done, all new users will receive an invitation and can start using ApprovalMax right away.
How to create bills in ApprovalMax
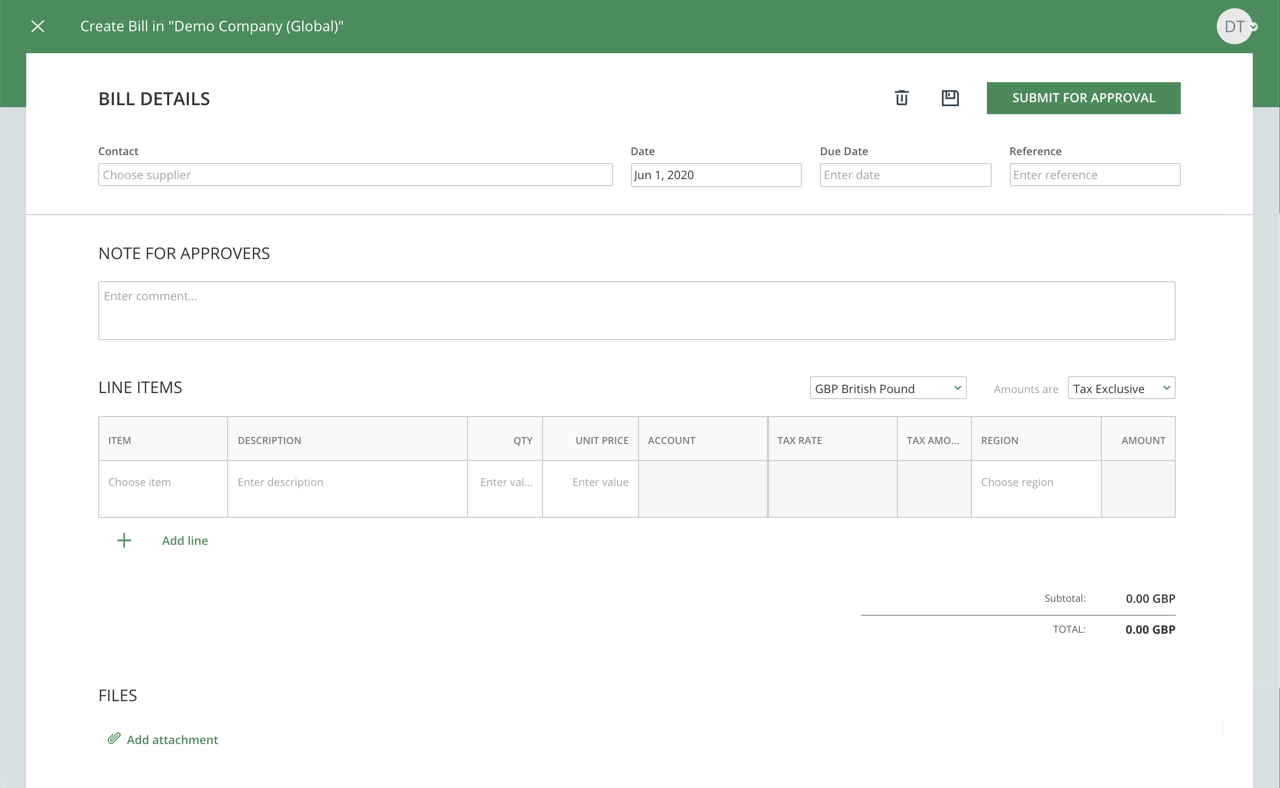
To create a new bill, use the “NEW REQUEST” button and select “Bill”. This will open a bill form for entering details such as supplier, due date, etc. It is also possible to add attachments. Some data is synced from Xero. So, when you select a supplier the related information will be entered automatically; the same goes for inventory item data. When everything is filled in, hit the “Submit for approval” button. Now, the bill is created and ready for the approval process.

What happens after bill creation?
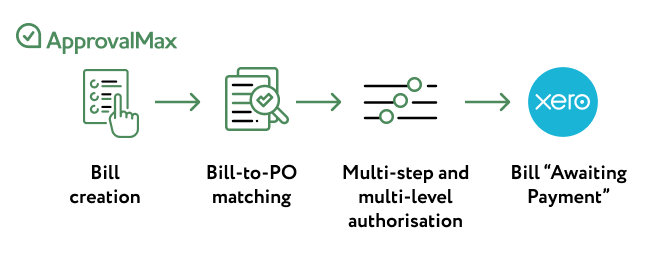
As soon as a bill has been created in ApprovalMax, it will be routed automatically through a multi-step and multi-role approval process. The complete workflow looks as follows:

Bill creation
New bills are created via the “NEW REQUEST” button. Supplier information such as the address and contact details as well as inventory item data is pulled from Xero and entered automatically.
Bill to purchase order matching
For all bills with a corresponding purchase order there is the option to match bill and purchase order in ApprovalMax. This step is optional.
Multi-step and multi-role authorisation
The automated approval workflow routes all new bills through a multi-step and multi-role authorisation process, which is based on one or several criteria like supplier, tracking category, amount, etc. synced from Xero.
Bills “Awaiting Payment”
Once reviewed and authorised, bills are pushed to Xero in the “Awaiting Payment” status – ready to be paid and to be accounted for in the GL reports. An audit report that captures the complete authorisation history including approver comments is created automatically.
Find out more at https://www.approvalmax.com/xero/creating-bills

